I promised you all I’d keep you updated on my clean-up progress. While I was procrastinating, another group of guys got together and blasted through the work in a manner to which only teens fueled by pizza and soda can accomplish.
I’ve actually tried their patches, and they seem to work well, making playing Crysis with the volume it deserves a much less cringy experience.
I’d recommend heading over to http://www.gamesoap.net. If their files give you any problems, just send me (or them) an e-mail. (Mine is {myfirstname}@wilcoxfamily.net.)
Thanks, guys from GameSoap. (And I’d add Company of Heroes to my wishlist for cleaned up games. I’ve looked into it, and even know how to edit the files; putting them back into the game is what I never finished.)
Blessings to you all.
Crysis rules!
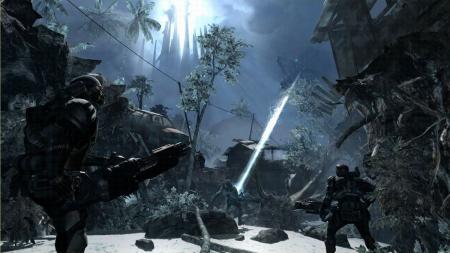
This in-game screen shot shows some of the visuals that make Crysis so amazing.
Crysis is, without a doubt, completely deserving of the 98% score awarded to it by PC Gamer. Crytek built so well upon the immersive environment and storytelling that they had nearly perfected in Far Cry, that my kids and I have spent hours playing it, wearing out the demo mission, and then losing our lives for several weeks when the full version arrived.

Unfortunately, it has one small problem beyond the currently high hardware requirements. True to its military nature, the characters suffer from a severe case of potty-mouth. This really wasn’t acceptable to me, and Crytek didn’t provide a language filter or switch, so I decided to do something about it. And now you can, too!
Are you as smart as my kids?
There are a few assumptions here. I assume that you are reasonably proficient in a windows file system, and can do basic things like rename files, work with compressed folders (Zip archives), and know the difference between a file and folder.
Finding your starting point
First, find your Crysis folder. It’s probably c:Program FilesElectronic ArtsCrytekCrysis. Then drop down to GameLocalized.
Showing file extensions … step one toward becoming a power-user
For the folders in which we will be working, you will want to show file extensions for known file types via the Folder … Options dialog (see image below), unchecking the box marked “Hide file extensions for known file types.”

This is how to show those oh-so-useful file extensions.
Begin by making a backup
The english.pak file is the one you’re going to extract and modify, so we’ll make a backup of it first. Copy the english.pak file, and name the copy english.pak.original. You should end up with something like this:

The key here is, that the english.pak file is really just a pkZip-compatible archive with a different name. We can, using the wonders of Windows XP, extract it, modify its contents, and repackage it. (We could directly modify its contents just like any other folder, but there would be delays while the operating system uncompresses files that would soon become frustrating.)
Rename your english.pak file to english.pak.censored.zip.
Extraction
Right-click on english.pak.censored.zip, and choose Extract All ... from the context menu, which will open the Extraction Wizard. Click Next several times, watch the Extracting ... meter for a bit, and you’ll be ready for the next step.
Clearing the read-only attributes
To avoid possible repeated annoyances, you need to clear any read-only attributes on the exacted files. Right click on the newly-created extracted folder (which should be named english.pak.censored), and choose Properties. Click on the box marked Read-only until it is empty, and click OK. At the prompt that appears, choose Apply changes to this folder, subfolders and files. This will allow you to do the renaming or editing you need, without having to answer 7,439 prompts.

Clearing the read-only attribute for a bunch of files.
In the newly-created extracted folder (which should be named english.pak.censored), open up the Languages folder, then the dialog folder. From here you are going to have to search for text within files. Ah, but wait! Windows XP, by default, won’t find text within files that don’t have file types it knows about. So, you’re going to have to tweak your system in one more way to find what we need within the .fsq files (to be explained momentarily) that Crysis uses.
Fixing the darned Find Text within Files feature in Windows XP
Find your My Computer icon, right-click on it, and choose Manage. In the Computer Management console, click the plus sign next to Services and Applications, and then right-click on Indexing Service and choose Properties. (We won’t actually be activating the CPU-wasting Indexing Service, but the setting to fix the Find Text within Files feature is part of that service.) Be sure the box marked Index files with unknown extensions has a check mark in it, click OK, and then close the Computer Management console. (See the image below.)

Fixing the Find Text within Files feature in Windows XP.
Search and destroy the #!%#!$#!@$ bad language
Now we can find and eliminate any language you might find offensive. You should have a folder open to something like english.pakLanguagesdialog. Press F3 or click the Search button at the top of the window to open the Search Companion. Click All Files or Folders, and enter *.fsq in the All or part of the file name: box, and the word you want to eliminate from the dialog in the A word or phrase in the file: box. In the example pictured below, I’ve entered nomad, which can hardly be considered profane, but you get the idea.

Personally, I hate the silly dog, and have hacked my account with TweakUI so it doesn’t show up. This screen shot is from my youngest son’s account.
Click Search Now to start the search. It will take a few moments to find the files for which you are looking, but you can start with the first one it finds. You will know the search is complete when the Search Now button becomes active again.
Right-click on the first file in the list, and choose Open Containing Folder. That will open the folder containing that file, and highlight the file, as shown below.

In my example, greets_02.fsq is highlighted. It isn’t necessary to do so, but you can open the file and view it if you like. (Windows will ask you how you want to open it. Tell it to Select the program from a list, and have it opened in Notepad or WordPad.) The .fsq files actually contain the XML that drives the facial animation when the in-game characters are speaking, and I found it fascinating. The files also contain the “real” text for the spoken dialog, which is why we can use them to find offensive language.
As I said, it isn’t necessary to examine the .fsq files, unless you want to verify exactly what the dialog is that they describe. Notice that the folder you’ve opened contains two files with the same file name, but different suffixes. The one that ends in .mp2 is an MPEG layer 2 audio file that contains the actual dialog audio. To eliminate it from being spoken in the game, just rename it .mp2_ (or anything else you like; putting underscores in file names is kind of a Geeky programming thing to do). I do recommend keeping the name the same and modifying the 3-letter extension, though, because you may wish to get at these files again later.

Renaming a file.
Once you’ve done that, close the folder that contains these files (the one that opened when you chose Open Containing Folder). Then go to the next file the search found, right-click on it, and choose Open Containing Folder again. Repeat as necessary, and run new searches as necessary, until the game reaches the language level you’re comfortable with. (My target was somewhere between rated G and rated PG.)
(Rather than just rename the files, one could use an audio editor like Audacity to remove the offensive words. It is my intention to do this with some of the longer dialog clips, but I have not taken the time to do so yet.)
Packing it all back up
Once you are done running all your searches and renaming all the files you wish to change (and this may take a while), as there are quite a few, the last step is to recompress all the files into a new compressed folder named english.pak, and be sure that file is in the correct location. Go back to your C:Program FilesEA GamesCrytekCrysisGameLocalized folder, right-click on the english.pak.censored folder, and choose Send To then Compressed (zipped) folder. This will create a new file called english.pak.zip, and will probably take a couple of minutes.

Recompressing the modified folder into a .zip file.
Lastly, delete english.pak (you should have it backed up as a file named english.pak.original), and rename english.pak.zip to english.pak. You should then be ready to play Crysis and not feel the need to wash out the character’s mouths (especially Psycho’s) with virtual soap.
Other possibilities
Now, if you don’t want to go to all this trouble, if you send me a really nice e-mail (or a 512 MB NVIDIA 8800 GT), I just might point you to a place you can download my modified .pak file. (Mine is {myfirstname}@wilcoxfamily.net.)
Next on my list of games to fix: Company of Heroes.

; "http://www.dharmawantsyou.com/")

; "Missionary Pastor Mike Matheson")

; "Flag of Guinea-Bissau")
; "Duct tape in use on the fender of the Apollo 17 lunar buggy.")


; "From Mechanix Illustrated (Modern Mechanix), November 1968, we get a glimpse of 2008.")


; "Lego building set 190.")
; "Lego set number 404")
; "The Lego space cruiser.")
; "Lego's first castle set.")
; "The Lego RIS - Robotics Invention System")
; "An iconic robot constructed from the Lego NXT.")
;)
;)
; "Fixing the Find Text within Files feature in Windows XP.")
; "Search results - open containing folder")