Weasley Clock Code – Now with WiFi

Back at one of Veracode’s Hackathons, I published the video below.

My Original Weasley Clock

The New and Improved Weasley Clock(s)

(Original post is here.) I was determined to update the code to use WiFi, and make some other improvements, so finally rewrote it. Here’s the first major revision:

#include 
#include "Adafruit_IO_Client.h"
#include 

/**
 * https://www.amazon.com/gp/product/B015RQ97W8/ref=oh_aui_search_detailpage?ie=UTF8&psc=1
 * 5-wire unipolar steppers with controller
 * Longruner 5x Geared Stepper Motor 28byj 48 Uln2003 5v Stepper Motor Uln2003 Driver 
 * Board for arduino LK67
 * 
 * AWESOME details on these motors/controllers:
 * https://arduino-info.wikispaces.com/SmallSteppers
 * 
 * Much Better than standard stepper library: AccelStepper
 * http://www.airspayce.com/mikem/arduino/AccelStepper/classAccelStepper.html
 * 
 * Weasley Clock
 * -------------
 * 
 * Created by Doug "LegoDoug" Wilcox for Veracode Hackathon IX.
 * 
 * Video of the completed project is at https://www.youtube.com/embed/oRUViFnxKsg.
 * 
 * "Share and enjoy."
 */

/************************* WiFi Access Point *********************************/
#define WLAN_SSID "DefinitelyNotMySSID"              // "...your SSID..." Amusingly, the cannot contains spaces or hyphens.
#define WLAN_PASS "TotallyNotTheRealPassword"        // "...your password..."


/************************* Adafruit.io Setup *********************************/

#define AIO_SERVER           "io.adafruit.com"
#define AIO_SERVERPORT       1883                           // use 8883 for SSL, otherwise use 1883
#define AIO_USERNAME         "TotallyNotMyAdaFruitIOUser"   // "...your AIO username (see https://accounts.adafruit.com)..."
#define AIO_KEY              "TotallyNotMyAdafruitIOKey"    // "...your AIO key..."
#define AIO_FEED_PATH        "/feeds/"
#define AIO_PUBLISH_FEED     "weasleyclockposition"
#define AIO_SUBSCRIBE_FEED   "weasleyclockstatus"

// Motor pin definitions
#define motorPin1  14    // IN1 on the ULN2003 driver 1
#define motorPin2  12    // IN2 on the ULN2003 driver 1
#define motorPin3  13    // IN3 on the ULN2003 driver 1
#define motorPin4  15    // IN4 on the ULN2003 driver 1

#define DELAY 1
#define HALFSTEP 8

/************ Global State (you don't need to change this!) ******************/

// Create an ESP8266 WiFiClient class to connect to the WiFi network.
WiFiClient client;
// or... use WiFiFlientSecure for SSL
// WiFiClientSecure client;

// Create an Adafruit IO Client instance.  Notice that this needs to take a
// WiFiClient object as the first parameter, and as the second parameter a
// default Adafruit IO key to use when accessing feeds (however each feed can
// override this default key value if required, see further below).
Adafruit_IO_Client aio = Adafruit_IO_Client(client, AIO_KEY);

// Alternatively to access a feed with a specific key:
Adafruit_IO_Feed clockFeed = aio.getFeed(AIO_SUBSCRIBE_FEED, AIO_KEY);

// States
const String LD_HOME         = "ld_na";
const String LD_TRAVELING    = "ld_tr";
const String LD_VERACODE     = "ld_of";
const String LD_CHURCH       = "ld_ch";
const String LD_MORTAL_PERIL = "ld_mp";
const String LD_GLOUCESTER   = "ld_gl";
const String PLUS_ONE        = "plus_1";
const String MINUS_ONE       = "minus_1";
const String PLUS_FIVE       = "plus_5";
const String MINUS_FIVE      = "minus_5";
const String NO_MOVEMENT     = "none";

// Steps
const int STEPS_HOME         = 0;
const int STEPS_TRAVELING    = 600;
const int STEPS_VERACODE     = 1250;
const int STEPS_CHURCH       = 1900;
const int STEPS_MORTAL_PERIL = 2600;
const int STEPS_GLOUCESTER   = 3450;
const int STEPS_ONE          = 32;
const int STEPS_FIVE         = 5 * 32;

String fValue = "";

const unsigned long requestInterval = 5000L; // delay between updates, in milliseconds

void stepBySteps(int newPosition, boolean resetWhenDone = false);

AccelStepper clockStepper(HALFSTEP, motorPin1, motorPin3, motorPin2, motorPin4);

void setup() {
  Serial.begin(115200);
  delay(10);

  // Connect to WiFi access point.
  Serial.println(); Serial.println();
  Serial.print("Connecting to ");
  Serial.println(WLAN_SSID);

  WiFi.begin(WLAN_SSID, WLAN_PASS);
  while (WiFi.status() != WL_CONNECTED) {
    delay(500);
    Serial.print(".");
  }
  Serial.println();
  Serial.println("WiFi connected");
  Serial.print("IP address: ");
  Serial.println(WiFi.localIP());

  clockStepper.setMaxSpeed(1000.0);
  clockStepper.setAcceleration(100.0);
  clockStepper.setSpeed(200);
  clockStepper.setCurrentPosition(0);
}

void loop() {
  // Wait for a bit and read the current feed value.
  Serial.println(F("Waiting ..."));
  delay(requestInterval);
  // To read the latest feed value call the receive function on the feed.
  // The returned object will be a FeedData instance and you can check if it's
  // valid (i.e. was successfully read) by calling isValid(), and then get the
  // value either as a text value, or converted to an int, float, etc.

  Serial.println(F("Checking feed ..."));
  FeedData latest = clockFeed.receive();
  if (latest.isValid()) {
    Serial.print(F("Received value from feed: ")); Serial.println(latest);
    // By default the received feed data item has a string value, however you
    // can use the following functions to attempt to convert it to a numeric
    // value like an int or float.  Each function returns a boolean that indicates
    // if the conversion succeeded, and takes as a parameter by reference the
    // output value. Also, beware. There seems to be a limit on how long the
    // feed value can be. I had trouble when "minus_five" was used, which makes
    // me think the limit is 8 characters.

    // Want some fun? Learng about "conversion from 'FeedData' to non-scalar type 'String' requested" the hard way.
    fValue = latest;

    if(fValue == LD_HOME) {
      Serial.println("Nashua");
      stepBySteps(STEPS_HOME);
    }
    if(fValue == LD_TRAVELING) {
      Serial.println("Traveling");
      stepBySteps(STEPS_TRAVELING);
    }
    if(fValue == LD_VERACODE) {
      Serial.println("Veracode");
      stepBySteps(STEPS_VERACODE);
    }
    if(fValue == LD_CHURCH) {
      Serial.println("Church");
      stepBySteps(STEPS_CHURCH);
    }
    if(fValue == LD_MORTAL_PERIL) {
      Serial.println("Mortal Peril!");
      stepBySteps(STEPS_MORTAL_PERIL);
    }
    if(fValue == LD_GLOUCESTER) {
      Serial.println("Glostah");
      stepBySteps(STEPS_GLOUCESTER);
    }
    if(fValue == PLUS_ONE) {
      Serial.println("Forward one.");
      stepBySteps(clockStepper.currentPosition() + STEPS_ONE, true);
    }
    if(fValue == MINUS_ONE) {
      Serial.println("Back one.");
      stepBySteps(clockStepper.currentPosition() - STEPS_ONE, true);
    }
    if(fValue == PLUS_FIVE) {
      Serial.println("Forward five.");
      stepBySteps(clockStepper.currentPosition() + STEPS_FIVE, true);
    }
    if(fValue == MINUS_FIVE) {
      Serial.println("Back five.");
      stepBySteps(clockStepper.currentPosition() - STEPS_FIVE, true);
    }
    if(fValue == NO_MOVEMENT || fValue == "") {
      Serial.println("Not moving.");
    }
  } else {
    Serial.print(F("Failed to receive the latest feed value!"));
  }
}

void stepBySteps(int newPosition, boolean resetWhenDone) {
  clockStepper.enableOutputs();
  clockStepper.moveTo(newPosition);

  while (clockStepper.isRunning()) {
    clockStepper.run();
    delay(DELAY);
  }
  clockStepper.disableOutputs();

  if (resetWhenDone) {
    clockStepper.setCurrentPosition(0);
  }
  
}

Still to come, if I ever get around to it:

  • Alternative methodologies for reading the feed (publish/subscribe).
  • Secure WiFi communication.
  • Adjustment (such as after power disconnect) via an induction sensor.

Weasley Clock Code

Note: I’ve finally gotten around to a much-needed rewrite for WiFi. You can find that code and another video here.

Back at Veracode’s last Hackathon, I published the video below. People have started discovering this and asking questions about it, so here is the code for it:

/*
  Weasley Clock
  -------------

  Created by Doug "LegoDoug" Wilcox for Veracode Hackathon IX.

  Video of the completed project is at https://www.youtube.com/embed/oRUViFnxKsg.

  "Share and enjoy."

 */

// Arduino SPI (Serial Peripheral Interface) library - https://www.arduino.cc/en/Reference/SPI
#include <SPI.h>             
// Arduino Ethernet library - https://www.arduino.cc/en/Reference/Ethernet
#include <Ethernet.h>        
// Arduino Stepper library - https://www.arduino.cc/en/Reference/Stepper
#include <Stepper.h>         
// Adafruit REST IO library - https://learn.adafruit.com/adafruit-io/arduino
// See also https://www.arduino.cc/en/Tutorial/WebClientRepeating
#include "Adafruit_IO_Client.h"    
                                   

// assign a MAC address for the ethernet controller.
byte mac[] = {
  0x8C, 0xDC, 0xD4, 0x4A, 0xC9, 0xC2
};

// initialize the library instance:
EthernetClient client;

// last time the Arduino connected to the server, in milliseconds
unsigned long lastConnectionTime = 0;        
// delay between retrieving updates, in milliseconds
const unsigned long requestInterval = 5000L; 

// Configure Adafruit IO access. You will need to create your own 
// Adafruit IO account (free), and set up a feed, and provide your
// feed and AIO key in the code below.
#define AIO_FEED   "weasleyclockstatus"
#define AIO_KEY    "XXXXXXXXXXXXXXXXXXXXXXXXXXX"

// Create an Adafruit IO Client instance.  Notice that this needs to take a
// WiFiClient object as the first parameter, and as the second parameter a
// default Adafruit IO key to use when accessing feeds (however each feed can
// override this default key value if required, see further below).
Adafruit_IO_Client aio = Adafruit_IO_Client(client, AIO_KEY);

// Alternatively to access a feed with a specific key:
Adafruit_IO_Feed clockFeed = aio.getFeed(AIO_FEED, AIO_KEY);

// States - These are the codes that correspond to specific clock positions.
const String LD_HOME         = "ld_na";
const String LD_TRAVELING    = "ld_tr";
const String LD_VERACODE     = "ld_of";
const String LD_CHURCH       = "ld_ch";
const String LD_MORTAL_PERIL = "ld_mp";
const String LD_GLOUCESTER   = "ld_gl";

// Steps - How many steps the motor needs to move to point to a specific position 
// on the clock.
const int STEPS_HOME         = 0;
const int STEPS_TRAVELING    = 750;
const int STEPS_VERACODE     = 1600;
const int STEPS_CHURCH       = 2450;
const int STEPS_MORTAL_PERIL = 3350;
const int STEPS_GLOUCESTER   = 4350;

// Someday, I will determine what this actually does. (I don't think, functionally, 
// it has any affect.)
const int stepsPerRevolution = 200;  

long motorPosition = 0L;         // Number of steps the motor has taken.
String fValue = "";              // Feed value.

Stepper clockStepper(stepsPerRevolution, 7, 6, 5, 4, 8);

void setup() {
  // start serial port:
  Serial.begin(9600);
  while (!Serial) {
    ; // wait for serial port to connect. Needed for native 
      // USB port only, on certain Arduino models.
  }

  // give the ethernet module time to boot up:
  delay(1000);
  // start the Ethernet connection using a fixed IP address and DNS server:
  //Ethernet.begin(mac, ip, myDns);
  // Or, just start it with dynamic DNS by giving it a MAC address.
  Ethernet.begin(mac);
  // print the Ethernet board/shield's IP address:
  Serial.print("My IP address: ");
  Serial.println(Ethernet.localIP());

  clockStepper.setSpeed(20);
}

void loop() {

  // Wait for a bit and read the current feed value.
  Serial.println(F("Waiting ..."));
  delay(requestInterval);
  
  // To read the latest feed value call the receive function on the feed.
  // The returned object will be a FeedData instance and you can check if it's
  // valid (i.e. was successfully read) by calling isValid(), and then get the
  // value either as a text value, or converted to an int, float, etc.
  FeedData latest = clockFeed.receive();
  if (latest.isValid()) {
    Serial.print(F("Received value from feed: ")); Serial.println(latest);
    // By default the received feed data item has a string value, however you
    // can use the following functions to attempt to convert it to a numeric
    // value like an int or float.  Each function returns a boolean that indicates
    // if the conversion succeeded, and takes as a parameter by reference the
    // output value.

    // Want some fun? Learning about "conversion from 'FeedData' to non-scalar 
    // type 'String' requested" the hard way.
    //
    // If I remember correctly, it was a casting error caused by trying to use 
    // the 'latest' variable as a String, directly.
    // The following line casts 'latest' to a string and lets us use it as 'fValue'.
    fValue = latest;
    
    if(fValue == LD_HOME) {
      Serial.println("Nashua");
      stepBySteps(STEPS_HOME);
    }
    
    if(fValue == LD_TRAVELING) {
      Serial.println("Traveling");
      stepBySteps(STEPS_TRAVELING);
    }

    if(fValue == LD_VERACODE) {
      Serial.println("Veracode");
      stepBySteps(STEPS_VERACODE);
    }
    if(fValue == LD_CHURCH) {
      Serial.println("Church");
      stepBySteps(STEPS_CHURCH);
    }
    if(fValue == LD_MORTAL_PERIL) {
      Serial.println("Mortal Peril!");
      stepBySteps(STEPS_MORTAL_PERIL);
    }
    if(fValue == LD_GLOUCESTER) {
      Serial.println("Glostah");
      stepBySteps(STEPS_GLOUCESTER);
    }
    
  } else {
    Serial.print(F("Failed to receive the latest feed value!"));
  }

}

void stepBySteps(int newPosition) {
  if(motorPosition == newPosition) {
    Serial.println("No movement required.");
    return;
  }

  long steps = newPosition - motorPosition;
  
  clockStepper.step(steps);
  motorPosition = newPosition;
  Serial.print("position should now be:" );
  Serial.println(motorPosition);
}

Pagination Control While Printing in Flex: Unwrap mx.printing.FlexPrintJob’s Private flash.printing.PrintJob Variable

I’ve worked with Adobe’s Flex platform now for several years, beginning with my Star Trek transporter simulator, a project I wrote for a Boston University course.

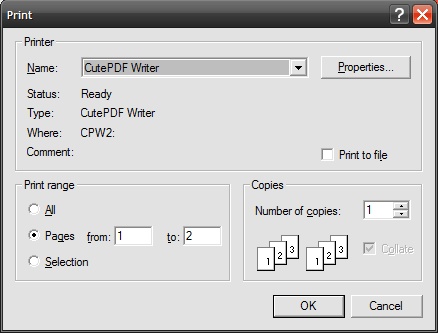
Now, my job at Transparent Language involves mostly FFA (Flash/Flex/AIR) development, and I enjoy the challenges of working in this fairly cutting-edge environment. This week, though, I was shocked by an apparent limitation in the mx.printing.FlexPrintJob class: It doesn’t return the operating system’s print dialog information to the Flex application. So, if I want to print, say, the first five pages of a document, it cannot normally be done. It’s all or nothing, regardless of what I specify in the OS print dialog.

Windows XP operating system print dialog.

The FlexPrintJob class wraps an older class, PrintJob. The primary difference is that PrintJob, designed for Flash, takes a Sprite as passed parameter to its addPage() function, whereas FlexPrintJob’s equivalent addObject() takes a UIObject. Fair enough.

But, what’s weird, is that the FlexPrintJob class contains a private PrintJob object, but it doesn’t expose any of the useful properties of that PrintJob object, except pageHeight and pageWidth. Want the printer name? The first and last pages in the page range the user has entered? The paper size? The orientation? Forget it! None of them are accessible.

Granted, most of these properties are AIR-only, but I’m working on an AIR project, and it would be darned useful for my users to be able to control their output, which can often run to many tens of pages, so I really need access to the properties of the “hidden” PrintJob object.

Thankfully, there’s a relatively easy solution. I can du plicate the FlexPrintJob class, and add accessors (getters) that will allow me to read the variables I need. Normally, I’d extend the class, but because the object and properties I need are private, I can’t even do that. I have to essentially clone the class, and add what I need to it. Thankfully, FlexPrintJob is part of Adobe’s code that has been open-sourced, so I can do this with impunity, and even distribute it.

So, I open the FlexPrintJob code, copy it to an empty class, rename it to FlexPrintJobExtended, and remove the reference to import Version.as, and add the following:

//--------------------------------------------------------------------------
//
//  Additional accessors for PrintJob object
//
//--------------------------------------------------------------------------

public function get copies():int {
    return printJob.copies;
}

public function get firstPage():int {
    return printJob.firstPage;
}

public function get isColor():Boolean {
    return printJob.isColor;
}

public function get jobName():String {
    return printJob.jobName;
}

public function get lastPage():int {
    return printJob.lastPage;
}

public function get maxPixelsPerInch():Number {
    return printJob.maxPixelsPerInch;
}

public function get orientation():String {
    return printJob.orientation;
}

public function get paperArea():Rectangle {
    return printJob.paperArea;
}

public function get paperHeight():int {
    return printJob.paperHeight;
}

public function get paperWidth():int {
    return printJob.paperWidth;
}

public function get printableArea():Rectangle {
    return printJob.printableArea;
}

public function get printer():String {
    return printJob.printer;
}

Then, wherever I needed the FlexPrintJob class, I can then use my FlexPrintJobExtended class instead, and get access to all the glorious properties on the now-much-friendlier printJob object. Note that I’ve kept the properties read-only, by only writing getters. I did not envision any need to change the values: I only wanted to know what the user told the operating system.

The next obstacle is in the sample code provided for printing multipage documents. Begin by consulting the published examples for Printing with multipage PrintDataGrid controls. I’m not going to elaborate too much on this, merely illustrate how to get to the next step, printing multiple pages using the pages the user specified.

Looking at the section of the sample code marked with // The function to print the output, there are only a few things we need to change.

First, we need to change the FlexPrintJob instance created to use our new class:

// Create a FlexPrintJobExtended instance.
var printJob:FlexPrintJobExtended = new FlexPrintJobExtended();

The user might not have chosen to start on page one, so we need to advance to the first page the user has chosen.

// Jump to the first specified page, not necessarily page 1.
while (errorPrintView.pageNumber < printJob.firstPage && errorPrintView.printGrid.validNextPage) {
	thePrintView.printGrid.nextPage();
	thePrintView.pageNumber++;
}

Then we modify the

while(true)

so that it won't go further than the number of pages the user has specified.

// Loop through the following code until all pages are queued.
// If the user has chosen to print all pages, printJob.lastPage will be zero.
while(printJob.lastPage == 0 || thePrintView.pageNumber <= printJob.lastPage)

Voila!

Feel free to download the code cited in this post: FlexPrintJobCode.zip.

If you find this to be useful, or find a better way to do it, let me know, by e-mailing "doug" at this domain. Cheers!

My [Computerized] Workspace

For those of you who have wondered what my electronic workspace (and day) look like.

This is what my workspace typically looks like. It’s spread across two monitors, each running at a resolution of 1280 x 1024. (Click through to see it at full resolution.)

Not Far Off: Amazing Future Visions

Ten years from now, this is where we very well may be. Click through to see these jaw-dropping videos. We’re already starting to see application of this technology. Ten years to make it commonplace sounds reasonable.

Future Vision Montage

Health Future Vision

Productivity Future Vision

See more at Microsoft Office Labs.

These remind me of the A&T “You Will” ads from 1993, which have proven to be quite accurate:

My yaar Aashay Joshi pointed me to the Microsoft videos.

Outsourcing the Wilcox Family: Next Stop, China

The economy can certainly make life interesting. At times, this leads to momentary tension, such as today when my boss called me in to his office to discuss some internal reorganization.

Little did I know, when I started studying Mandarin last fall that it would be so useful!


View Larger Map

I don’t have all the details yet, but for the next five years, we will be relocated to Shenyang, the capitol of the Liaoning province, China, where I’ll be helping to lead a software development project integrating YUI components into our existing suite. The company will pay for our relocation and intensive language school.

Wow!

[Editor’s Note, April 20, 2009: There is an important follow-up to this post here. Please be sure to read it.]

FIRST LEGO League: We Won!

Since the school year began, I’ve been teaching Lego Robotics two morning’s a week at Isaac’s new school, the Academy for Science and Design Chartered Public School, in Merrimack New Hampshire.

Many of you know I’ve been teaching Lego Robotics twice a week at the Academy for Science and Design, in Merrimack, N.H. As a function of the class, we had two teams competing in the FIRST LEGO League branch of the FIRST Robotics program, founded by Dean Kaman. (See http://www.usfirst.org/community/fll/ .) The ASD is a chartered public school, now in its second year of operation.

At the “MindStorms Madness” qualifying tournament in Merrimack, N.H., on Saturday, the two teams from the ASD came away with three trophies:

The team I officially coach, Robotic Revolution, won first place in the Technical category (Robot design and programming), and will go on to compete at the state competition on December 6 at Nashua South High School.

The other team I taught (but did not officially coach) won 2nd place in Technical, and got the top score during the seeding matches. (Sadly, they were eliminated in the finals.)

The photos from the slide show above are available here on PicasaWeb.

I’ll update this post with more details about the team and the event sometime in the next day or two.

Shiver Me Timbers! Talk Like a Pirate Day Be on the Morrow!

‘Twas A grand, glorious day when I awoke. “Wench!” demanded I, “Where be me mornin’ grog?”

But then I learned a right powerful lesson: Be not calling a fair lass a “wench,” if’n she be stronger than thee. Painfully quick the lesson was, and quickly painful.

Why Is Programming Fun?

A couple of weeks ago, I finished reading The Mythical Man-Month: Essays on Software Engineering, Anniversary Edition (2nd Edition), after leaving it sitting on my dresser for ages. The book is a collection of essays about software design, the most famous of which became the book’s title—expressing the fundamental idea that adding personnel does not necessarily allow a project to be completed faster, just as nine women cannot produce a single baby in one month.

That particular essay, and probably several others, is worthy of a separate discussion; but one Frederick Brooks eloquently expresses has been on my mind for several years.

To be honest, I love my job. (Now, this isn’t to say I wouldn’t rather be paid to travel the world, build with Lego, or quest in World of WarCraft.) I can’t think of anything I’d rather do as a career than be a programmer, except maybe astronaut or Supreme Dictator of the Western Hemisphere. I had been mulling over exactly why this is for a very long time. Frederick P. Brooks has expressed what I feel far more eloquently than I believe I am able:

The Joys of the Craft

Why is programming fun? What delights may its practitioner expect as his reward?

First is the sheer joy of making things. As the child delights in his mud pie, so the adult enjoys building things, especially things of his own design. I think this delight must be an image of God’s delight in making things, a delight shown in the distinctness and newness of each leaf and each snowflake.

Second is the pleasure of making things that are useful to other people. Deep within, we want others to use our work and to find it helpful. In this respect the programming system is not essentially different from the child’s first clay pencil holder “for Daddy’s office.”

Third is the fascination of fashioning complex puzzle-like objects of interlocking moving parts and watching them work in subtle cycles, playing out the consequences of principles built in from the beginning. The programmed computer has all the fascination of the pinball machine or the jukebox mechanism, carried to the ultimate.

Fourth is the joy of always learning, which springs from the nonrepearing nature of the task. In one way or another the problem is ever new, and its solver learns something: sometimes practical, sometimes theoretical, and sometimes both.

Finally, there is the delight of working in such a tractable medium. The programmer, like the poet, works only slightly removed from pure thought-stuff. He builds his castles in the air, from air, creating by exertion of the imagination. Few media of creation are so flexible, so easy to polish and rework, so readily capable of realizing grand conceptual structures. (As we shall see later, this very tractability has its own problems.)

Yet the program construct, unlike the poet’s words, is real in the sense that it moves and works, producing visible outputs separate from the construct itself. It prints results, draws pictures, produces sounds, moves arms. The magic of myth and legend has come true in our time. One types the correct incantation on a keyboard, and a display screen comes to life, showing things that never were nor could be.

Programming then is fun because it gratifies creative longings built deep within us and delights sensibilities we have in common with all men.

I also loved the way Brooks closes his preface: “Soli Deo gloria—To God alone be glory.” This isn’t a perspective one generally finds in books about software.

(Excerpt from Frederick P. Brooks, The Mythical Man-Month: Essays on Software Engineering, Anniversary Edition (2nd Edition), © 1995, Addison-Wesley Longman, Inc., p. 7.)